
Instructions to Draw A Beehive – A Bit bit Guide. Honey is one of the best and shockingly nutritious food sources in nature! Like a tasty tidbit, it is likewise utilized for therapeutic and mending purposes. We wouldn’t have the option to partake in this delightful nibble without the honey bees that make it, and they can be tracked down in their particular bee colonies.
Everybody can perceive a Beehive when they see one, yet it can, in any case, be trying to figure out how to draw a Beehive.
That is no issue; however, though you might want to figure out how things are finished, you’re ideally located!
Also, check our Bee Coloring Pages
The Most Useful Strategy to Draw A Beehive
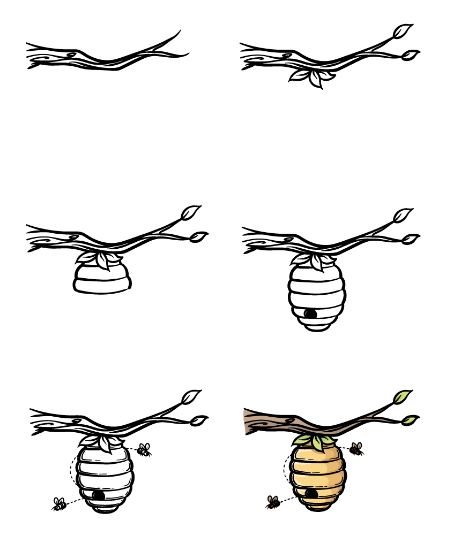
Step 1
A Beehive will typically be dangling from a branch when tracked down in nature, which is why this aide is the most proficient method to draw a Beehive; we will begin with the department.
To draw this branch, we will involve a few smooth yet somewhat breathtaking lines for its layout. It will end in two forked edges with sharp tips at their closures.
Then, at that point, whenever you have drawn this branch frame, you can begin to add an enumerating to it. We will do this by adding a few wavy lines onto the branch, some of which will have a little spin.
These lines will assist with providing the branch with the appearance of being together with wood.
Whenever you have drawn this branch to look like it does in our reference picture, you will be prepared to add additional subtleties to it in the subsequent stage!
Step 2
We don’t believe this tree should look too dead, so that we will add a few passes to this piece of your Beehive drawing.
To start, add a bunch of three passes onto the lower part of the branch. We will draw each leaf for certain bent lines that come full circle at a sharp point.
Then, each leaf will have a little line in the focal point of everyone for some extra detail. Whenever you have gotten the hang of it, add one more leaf onto each tip of the forked branch. In the following stage, we will then begin drawing the Beehive!
Step 3
Since you have the branch for your drawing, you can now begin to draw the star of the picture for this third step of our aide on the most proficient method to draw a Beehive! Colonies of bees are comprised of a few segments, and you can expand them down from the bunch of three leaves. Draw two little, bent lines down from these leaves, and afterward draw two more moving outward from the highest point of the hive.
There will likewise be a few bent lines going from left to right from each side of each segment of the hive. It’s as simple as this step, so we should continue so we can continue to add to the Beehive.
Step 4
You worked hard on the primary portion of your Beehive drawing, so this part where you draw the base half should demonstrate no test!
For this base half, you will do what you did in the past, drawing the different areas.
In the past step, the segments got more extensive as you went lower; however, they will begin getting smaller.
Whenever you have wrapped up drawing the Beehive frame, you can add a back, round shape onto the third segment from the base for the opening. Then it’s just a question of adding some last contacts and varieties, the two of which we will find in the previous two stages!
Step 5
Presently it is the right time to polish off the image in this step of our aide on the most proficient method to draw a Beehive. It will prepare you for the last step, where you will variety it! To start with, we added some bent line subtleties to the segments of the Beehive to give them a smidgen more profundity.

Then, at that point, we said something that each Beehive needs: honey bees! We drew two little honey bees humming around the hive, and for an additional tomfoolery contact, we added a path of little lines behind them to show their movement. You could likewise add your very own few subtleties before continuing! If you think this drawing is deficient in honey bees, you could add as many as you like! You could likewise attract a foundation to show what sets this hive. How might you polish off your image before the last step?
Step 6
It is the last step of your Beehive drawing, and this is where you can polish it off for certain incredible tones! We involved some lighter brilliant yellow for a large portion of the Beehive, and afterward, we integrated a few more obscure shades for concealing the sides of the hive. Then, we involved a few lighter tans and greens for the branch and left the hive dangling.

These varieties are what we picked, yet you can utilize any decision that is an enticement for you! Then, at that point, you have a lot of choices for the different artistry mediums and devices you could use to accomplish them. Make sure to have loads of fun as you articulate your thoughts with variety!
3 Additional tips to make your Beehive drawing simple!
See what’s going on with all the buzz as we make this Beehive drawing a piece simpler!
Tip#1
You can eliminate a portion of these additional subtleties to make the piece more straightforward.
Assuming you maintain that the spotlight should be simply on the Beehive itself, it should be possible. You could likewise do a few variants with fewer components while you get the hang of the drawing.
What components you eliminate would rely upon your inclinations and what you are most open to drawing.
Tip#2
Another way to make this Beehive drawing simple is by working on the plan. There are several ways to do this; you have a fascinating picture toward the end. For example, you might need to go for a lot easier framework shape for the Beehive. Maybe you could utilize a solid oval shape and afterward define a few boundaries along it. If you do this, you should make different components like the branch and honey bees easier in the plan. It would guarantee that the method of the whole drawing is steady. What are a few alternative ways that you could make the picture simpler for certain worked-on subtleties?
Tip#3
This last tip would be helpful whether you want some additional assistance or perhaps need to make your bee colony sketch more practical. We would suggest utilizing a genuine photograph of a Beehive to help you as you draw.
Assuming you look on the web, you will find various photographs of bee colonies. Your wisest choice is to find one that glances like the one in our model. Then, at that point, utilizing that photograph alongside our aide will permit you to get a superior vibe for the design of the bee colony. Looking into pictures of tree limbs and honey bees would likewise assist with those distinct components. It would again permit you to make the image unique and more enjoyable!
Your Beehive Drawing is Finished!
Also read: How To Draw A Seal